Joanna Campbell Slan has moved, searching new blog...

Wednesday, July 2, 2014

How to Make a Hummingbird Feeder -- Miniature Tutorial (1:12 scale)

I love using things that would normally hit the trash can. This project reminds me to look at familiar objects with fresh insight. For years I've tossed away the lids to the McDonald's beverages. I was amazed when I looked carefully and noticed the raised icons. I can't wait to see what I can do next with the other emblems!


SUPPLIES:

Red nail polish or acrylic paint
Yellow nail polish or acrylic paint
Red paper
Length of green floral wire (six inches)
Scissors
A needle or something to poke a small hole with
Circle punch (preferably the same diameter as the straw
Tacky Quick Drying glue
Clear drinking straw
The plastic lid from McDonald's cold beverage
Either--cardstock or air-dry clay


METHOD:

1. Locate the icon on the beverage that looks like a flower. Press air-dry class (such as DAS) into the icon and let dry. (Alternative: Cut out the flower. Glue it to cardstock. Cut out around it again.)
In the eleven o'clock position on the lid, you can see the flower icon.
 

2. When the icon is dry, paint it bright red. Add yellow dots to the flowers. (Tip: Use the end of a toothpick to make the dots perfect.)

3. Cut a length of the straw, about 1 inch long or so.

4. Cut a thin strip of red paper, about 3/8" wide and an inch long. Glue it around the top of your length of plastic straw. Let dry.

5. Put out a circle from the red paper with your circle punch. (Alternative: Trace the end of a straw on red paper. Cut out the traced circle.)

6. Put a tiny hole in the middle of the red circle. Enlarge it until the green floral wire will fit inside. Bend the floral wire into an upside down letter "L". Poke the shortest end into the hole in the red circle. Glue it to the red circle. You now have the cap of the lid and the wire stand.

7. Attach the red circle (cap of the lid and wire stand) to the top of the straw so that it meets the red strip of paper. Glue together. Coat with red nail polish.

8. Glue the flower to the bottom.

Monday, June 30, 2014

These Are a Few of My Favorite Things

I've been re-reading Elizabeth Gilbert's The Signature of All Things for the authors' book club I belong to. The book was my choice. It's almost guaranteed to spark a lively debate for many reasons. I find myself intrigued by the way that Alma, the main character, can find beauty and wonder in the world around her.

It is, I think, a talent well-worth having. To see past the broken, the ugly, and the dirty, and to find pockets of wonder. Perhaps it's a form of gratitude. Instead of taking the world for granted, it's an opportunity to appreciate the moment.

I try to do this in my books, leaving a trail of literary bread crumbs for the reader to follow. It's my way of sharing what has given me joy.  Because owning a Great Dane is out of the question for me at this juncture, I gave one to Kiki Lowenstein. Because I love turning trash into treasure, I assigned that job to Cara Mia Delgatto. Because I like to look like a lady (even if I don't behave like one!), I told Clancy that she has to be a Jackie Kennedy clone. The list goes on and on.

This morning, I was thinking about my favorite things, things that have or should become part of my books. What would you add to the list?


* blue patterned china
* sunrises
* miniatures
* ferns
* my Paris coffee mug
* my color printer
* my notebook computer
* our blue bedspreads
* Jax, my puppy
* Jax's toy, Foxie
* Hibiscus
* the beach
* thunderstorms
* a good book
* peanut butter
* fresh cherries
* the walk to my mailbox
* tissue paper
* greeting cards
* my comfy pajamas
* lavender the fragrance
* sandalwood

Okay, it's not all inclusive, but I think I'll stop and work on Kicked to the Curb, a book I love writing, but one that's been through TONS of rewriting!

Tell me about your favorite things!

Sunday, June 29, 2014

How to Make a Miniature Rustic Bench

My sister has this wonderful rustic chair outside her house. It was made with twigs (okay...BIG twigs), and I love it. Right now, rustic/twig furniture is all the small rage. This pattern will work for a real miniature setting (1:12 scale) or for a fairy garden.


This was also inspired by the wonderful tutorial by Lesley Shepherd. I urge you to check it out before you start this project. http://miniatures.about.com/od/miniatureprojects/ss/arustictble.htm

SUPPLIES:

Bendable twigs (I got mine from an Australian pine tree) in a variety of sizes (six, eight, and ten inches?)
Twigs of all sizes
Pine needles, dried (ditto that Australian pine) (or craft grasses or floral wire)
Cardstock (old cereal boxes are great)
Clothespins or clips
Wood glue or Elmers glue
Tacky glue (quick drying)
Waxed paper
Pencil
Black marker (a Sharpie)
Craft knife
Glass jar (2" across the lid. I used a 3 oz. jar of capers. Probably a glass Coke bottle would work, too.)
A pot to boil water in (I keep an old pot for crafting. Don't use it to eat out of later!)
Balsa wood, cut to 3" by 1 1/2" by 3/8" (This will be the seat of your bench)
Floral wires (Three or four. The plain uncolored type is best.T
Brown and black paint or markers
Hedge clippers or sturdy scissors
Tongs


METHOD:

1. Choose four small twigs to be legs for your bench. These should be roughly the same size. Set these aside. Tip: If they aren't the same length, use the hedge clippers or scissors on them. You can also sand them down to the right length. Mine are about 1 3/4" long.

2. Bend your longer twigs so that one end touches the left and one touches the right of your piece of balsa wood. The twigs should NOT break but it might not want to bend to this shape easily. That's okay. We're going to help it along.

3. "Drill' holes on the left and right to hold the ends of the twig. I used the tip of my X-acto knife and turn it around and around to "drill" the holes.


2. Fill your pot with water and start it boiling. Take it off the stove and put your twigs in the water. After about a five minute soak, use your tongs to retrieve them. Bend them around the jar. Clip the two ends of each twig together with clothespins and let them sit for an hour or so.

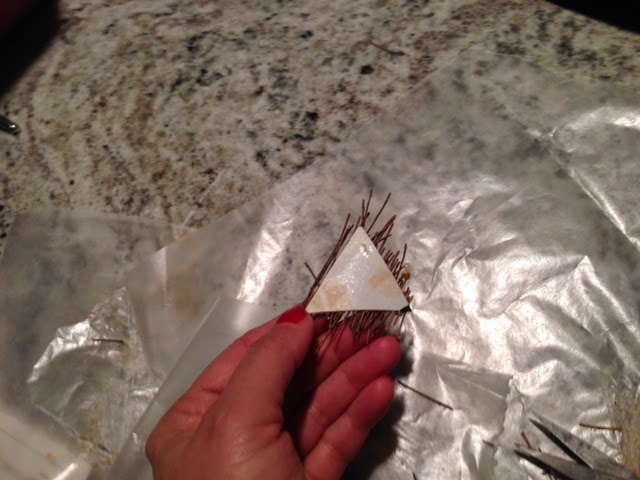
3. Use your piece of balsa as a pattern and trace it onto the cereal box. Cut out the rectangle. Draw an X in the middle of the rectangle, to delineate four triangles. Number the triangles 1, 2, 3, and 4. Cut them out. Using the balsa as a pattern, mark the holes with your Sharpie. Punch out holes in the cardstock to match where you have the holes in the balsa.


Learn From My Mistake or LFMM (because I make a lot of mistakes!): You'll notice that I marked the triangles on the plain, unprinted side of the cereal box--and then I covered those markings with pine needles. DUH! Mark the printed side of the box, not the plain side. (In other words, do the opposite of what I'm showing you above.) You'll use the plain, brown, unprinted side to glue your pine needles on!)

LFMM Draw an arrow showing you which way to point your pine needles. They should all point in, towards the center of your seat. This arrow will go on the plain side of the box, as I've shown you below. If you don't do this, you can get confused. Your pattern won't come out right.


4. Using the wood glue, start gluing pine needles onto the triangles. Keep the needles straight and next to each other as you go. They will hang over the edge of your pattern. No biggie!

LFMM (Remember that acronym! I'll use it a lot!) Don't spread the glue all over the triangle. Instead, make a stripe of glue about a quarter of an inch wide. Work one stripe at a time. This will give you more control.

LFMM Cut the pine needles into shorter pieces, about two inches long. They naturally have a curve. By cutting them, you don't have to deal with the curve.

LFMM To corral these little suckers, and to get them to line up neatly, use the tip of your X-acto knife or a plastic credit card.

5. Wrap the triangles in a piece of waxed paper. make a sandwich of them. Put something flat on them to help them dry properly. Alternatively, you could use two pieces of heavy plastic (like from a take out container) and pinch it together with clothes pins to help the triangles to dry flat. You might also want to add a little more glue to the top of the triangles. But not too much or the glue will show a lot.


6. Neatly trim the excess pine needles. Use your scissors.


7. If the bent wood is dry enough, you can unclip it. (You'll be amazed at the wonderful bend you'll get!) Size one piece to be the primary bent back for your bench. Test it and put it in the holes. Trim it with the hedge clippers or scissors if necessary. Insert into the holes, add glue, and use a bit of masking tape to hold them in place until they dry.


8. Using paint or markers, color your floral wire brown-black. Let it dry.

9. Reassemble the four triangles that make up the seat for your bench. (You're going to be so happy about those numbers on the back. They'll really help!) Adjust holes for the bent twig back of the bench. If you are happy with how it looks, glue the triangles onto the bench seat, the balsa wood. Trim around the seat with longer pieces of pine needles. See the photo below? I used a bit of masking tape to keep the longer pine needles down as they dried on the trim.

LFMM Lesley Shepherd used longer "pine needles" (she bought craft grasses) and first set down an X in the middle of her seat. Then she added the triangles. This made the whole thing look more finished.


10. Add another bent twig back. This one will be larger than the first. Glue the ends of it next to the ends of the first bent twig back.

LFMM You might want to make a tiny notch in the bench seat for the new twig back. It'll help keep the twig stable.

11. Wrap wire between the two bent twig backs.

12. Add spindles made of more twigs to the back.

13. At this point, you're basically done. You can add "arms" by trimming another bent twig and gluing to to one of the backs and to the seat. You can also add spindles between the legs, wrapping them with wire, if so desired.


Don't forget to admire your work. What a clever, clever crafter you are!

If you have any questions, just put them in the comments section below or email me at JCSlan@JoannaSlan.com

Sunday, June 15, 2014

How to Make Your New Dad Love You

A special Father's Day post by Jax, the Havanese puppy.

Being adorable is hard work. Time for a nap!
Even if that male human wasn't entirely sold on getting a new dog--and a puppy at that--you can change his mind. Here's how:

1. When you first meet, leap into your new human Dad's arms and lick his face. Over and over.
2. Nibble on his ears while you wiggle with joy.
3. When you are in the car on that long ride home, refuse to sit on your new Mama's lap. Crawl into Daddy's lap instead.
4. Then fall asleep.
5. Wag your tail and look at Dad with adoring eyes when he speaks.
6. Go potty whenever he takes you outside.
7. Snuggle up to him at every opportunity.
8. When Mama puts you on the floor to play, run and find Daddy.

It's just that simple! In no time at all, you'll own his heart.

Okay, any tips from you for making your human parents crazy-in-love with you?

Friday, June 13, 2014

Miniature Basket Tutorial

This is a fun project that keeps another bit of plastic out of the landfill. Here are two finished versions of this project.


SUPPLIES:


Empty and clean plastic coffee creamer container
Quilling strip (or strip of paper cut 3/8 inch wide)
Duct tape (optional)
Masking tape (cut into half inch pieces)
Scissors
Punch (optional)
Paper to match or contrast with your quilling strip
Beads (optional)

METHOD:

1. Cut the rim off the creamer container.


2. Carefully cut the container into spokes. (Tip: Follow the indentations.) (Note: You could use a permanent marker and color the base of your basket--the creamer container--at this point.)

3. Tape down the quilling strip.


4. Begin to weave it over and under. (Tip: If you have an even number of spokes, skip two at the start of each round. That gives you a nice alternating woven pattern.)


5. Use bits of masking tape to hold down each new quilling strip row. Otherwise the qulling strip will side up, up and away!

6. When you are as high as you want to go, tape down the end of the quilling strip.
7. Stick a piece of duct tape to a cutting mat or a glass surface. Cut it into a thinner strip. (Tip: Use a craft knife and a cork-backed ruler for this.)


8. Peel off the duct tape and wrap it around your basket. Alternatively, glue a quilling strip around the top of the  basket.


9. Decorate your basket with punched shapes and beads.

Ta-dah! Aren't you smart? (I know YOU are!)

Thursday, June 12, 2014

Kiki Lowenstein and the Penny Pincher: Part 2


By Joanna Campbell Slan 


Editor’s Note: In Part 1, Kiki Lowenstein, owner of Time in a Bottle, has been teaching a two-session class called “The Double-Dip.” This week, her customers will be bringing one of their favorite dessert recipes, a photo of the dessert, and the recipe to use in an 8- by 8-inch cookbook album. There's a bit of friction in the group because Iona Lippman and Lisa Ferguson both claim to make an outstanding red velvet cake. Furthermore, two of Kiki's customers have also challenged her come up with inexpensive scrapbook embellishments. Can Kiki keep everybody happy? 

(You can read Part 1 at http://www.chicagolandscrapbooker.com/kiki-lowenstein-and-penny-pincher-part-i/   Or you can read it by scrolling down to one of my earlier posts at 
http://joannaslan.blogspot.com/2014/05/kiki-lowenstein-and-penny-pincher-part-i.html )


"How's Baby Ty doing?" asked my friend Clancy, as she handed me the supplies for the second of our Double-Dip Classes.
"Fat and sassy," I said. My job was to put the pieces in a plastic baggy and slap on our new store label. I was particularly proud of the image—a glass jar filled with watches and the words "Time in a Bottle"—because I'd created the logo myself. Since the watches were every color in the rainbow, the logo went with everything! That was important because we had customers who loved bright colors, those who favored pastels, and some who liked neutrals.
Yes, every guest who walked through our doors was unique in every way, except for one: They all loved saving memories. It was our job to help them do just that.
"And his older siblings?" Clancy raised an eyebrow.
She was asking about my 13-year-old daughter Anya and her brother, 5-year-old Erik.
"They're adjusting. The other night when Ty was crying, Erik suggested we send him back to the hospital to get fixed. Anya had her grandmother take her to a drugstore where she bought a pair of silicone earplugs. I think it was more for effect than to really block out the noise."
"She's a smart kid," said Clancy, as she cast an eye at our big black clock. "T-minus ten minutes and counting."
As usual, Clancy was dressed as if she stepped out of a Talbot's catalog. Tonight she was wearing a pink knit top and gray pants. I'd given just birth last month and was still wearing maternity clothes. Tyler was a healthy and happy boy, so I tried not to let my squishy shape bother me. I also ignored the frequent splotches of baby spit-up that appeared on my shoulders.
"I think the women will like the layout I created for the dessert page in their cookbook albums," I said, "but the second portion of the evening is bound to be more challenging."
Iona and Avery Ailes had complained about the high cost of scrapbook layouts. They had dared me to come up with thrifty ways to create and embellish their pages. I'd been working feverishly all week to do just that.
I crossed my fingers that the two women would like what I'd done. Just then, the door minder rang. In walked Iona, dragging her Cropper Hopper behind her.
"Showtime," said Clancy.

< > < > < >

One session down and one to go. I had managed to keep Iona and Lisa from duking it out over the Red Velvet Cake. Iona's cake really was better. The hints of cinnamon and vanilla were scrumptious. She glowed with pride as we devoured our slices. Lisa said very little as she went to work diligently on her cookbook page. Maybe her feelings were hurt.
Time to move on.
"One of the quickest, easiest and cheapest ways to save money on any scrapbook layout is to make your own embellishments. I'm going to share a few new ideas for raw materials around your house that you can turn into embellishments. Are you ready?"
The women nodded at me with their pens poised to take notes.
"Hang tags from purchases—these I cover with paper or paint with acrylics before adding stickers or stamping on them. Labels from cans—these can be scanned or used as is. Greeting cards—I carefully cut around the images. Sometimes I use Diamond Glaze and a little glitter to spice them up. Old children's books—the images in these are adorable. Use 'as is' or add Diamond Glaze. Pages from old books—either use these as background paper or cut them into the shapes. They also make great flowers! Fabric—glue it or sew it directly to your paper. Scan or photocopy a design you like. Bottle caps—use them flat side down or flat side up. Either way you can add letter stickers. I've also colored them and used them in a row as a border of dots. Styrofoam trays—wash them, dry them, cut them into shapes, and paint them with acrylics. Gift wrap—can be used as background paper or you can select a special image and cut it out. Packaging—I reused the package of the perfume I got for Christmas. I flattened it and cut it into circles for embellishments."
At that point I paused. "Any questions?"
"And if we don't have access to a copier or a computer," asked Avery. "Then what do we do?"
"Use the tape transfer method. Rub packing tape over the image. Soak the image in warm water. Peel away the paper. Ta-da!"
But my excitement proved short-lived because Iona shrieked, "Who took my Red Velvet Cake recipe? It's missing!"

Editor’s note: Stay tuned for Part 3!

Editor's note:To read Part 1,  scroll down to earlier posts, or go to http://joannaslan.blogspot.com/2014/05/kiki-lowenstein-and-penny-pincher-part-i.html

Joanna Campbell Slan is the author of the Kiki Lowenstein Mystery Series, featuring a scrapbooking mom. To see a list of all of Joanna’s books, go to http://tinyurl.com/JoannaSlan. To enjoy another free Kiki short story, send an email to holidaygift@JCSlan.com.

Monday, May 5, 2014

Murder at the Breakers--Excerpt and Contest


Note: My friend Alyssa Maxwell has a new mystery, Murder at the Breakers. Thanks to her generosity we have an except below--and one lucky person will win an autographed copy.
Enjoy ~
Your friend, Joanna


Midnight approached. At twenty minutes to twelve, liveried footmen and hired waiters began moving like a silent army through the Great Hall, wielding trays filled with glasses of Uncle Cornelius’s finest champagne. In the confusion, I lost sight of Neily. I spotted Grace’s rich, bejeweled coif across the room, but only briefly. Then she, too, disappeared from view, though she might merely have been obscured by the crowd. If the two were up to something, Aunt Alice would have to catch them at it herself. I had more pressing concerns.

Aunt Alice herself fueled my unease when she appeared at my shoulder. “We’re nearly ready to toast Gertrude and I can’t find Cornelius anywhere. Did you see which way he went?”

Oh, no. I’d been so concerned with Neily, Reggie, and Katie, I’d let Uncle Cornelius slip away. With less than twenty minutes now before midnight, surely he’d return any moment. But if he didn’t . . .

Brady might just then be making his way up one of the service staircases. Should I try to warn him that Uncle Cornelius was nowhere to be found? But how could I do that when I had no idea which room marked Brady’s destination? I thought back to what he’d told me that morning. He wished to return something he’d taken . . . borrowed . . . stolen . . .  something to do with railroad business. Then it had to have come from either of two places: Uncle Cornelius’s office, or his bedroom, both on the second floor.

I might have gone running up the grand staircase to search for Brady, but the second-floor rooms all opened onto a gallery that looked down over the Great Hall. I couldn’t risk being seen and followed, especially by a family member.

Aunt Alice gave me the perfect excuse to leave the Great Hall and devise a plan. “Emmaline, be an angel and check the billiard room. Tell that husband of mine if he doesn’t come at once he’ll spoil Gertrude’s night.”

I set off at nearly a run, my haste raising numerous eyebrows. Several men occupied the billiard room, but Uncle Cornelius wasn’t one of them. Instead of seeking him elsewhere on the first floor, I slipped quickly out through the double doors onto the rear piazza and then down the steps onto the lawn. The day’s rain had left the grass sodden, and moisture instantly soaked through my embroidered dancing slippers. They’d be ruined, but I hadn’t time to lament the fact. Toes squelching, I circled the side of the house, looking up as I neared the front. The second story was dark except . . . there! A beam of light passed across the windows of Uncle Cornelius’s bedroom. Brady must be inside.

I was about to hoist my skirts, scamper around to the front door, steal inside and up the service stairs when the light suddenly went out. I waited, staring into the darkness, my ears pricked. “Brady,” I whispered—stupidly, for at that distance and through the closed balcony door he could not have heard me. A minute or two passed. I decided my best course was indeed to run inside, but just then a sharp thwack from above rooted me to the spot. Two or three more clunks followed. Moments later, the balcony door swung open and sounds of a scuffle burst from inside the room.

“What? You!” a man’s voice exclaimed.

“Brady?” I cried out hoarsely, too frightened now for discretion.

There came a grunt, more scuffling, another thwack—louder and sharper now, like a gunshot piercing the quiet—and then the thud of something or someone hitting the stone balustrade. My heart pounding, I scrambled backward to get a better view, and as I looked up again, a dark silhouette tumbled over the railing and plummeted to the ground at my feet.

**

I cried out, then pressed both hands to my mouth. My heart pummeled inside my chest, and I stood motionless, breathless, staring down at the black heap before me, my brain thrashing to make sense of what had just happened.

With trembling fingers I lifted my hems from the wet ground and tiptoed closer, afraid to look, unable to turn away. The night closed around me like a fist, blocking out the house, the lawns, the nearby drive crowded with sleek horses and posh carriages. The music and lively hum of voices drifting from the piazza doorway faded. The crickets were silenced. I heard only the distant rumble of the ocean striking the cliffs at the base of the property.

A haze swam before my eyes, and through it I could make out scant details about the figure sprawled facedown on the ground: the formal tailcoat and tapering black trousers, the buffed dress shoes, the dark but graying hair. A notion rose like bile to choke me.

“Uncle Cornelius? Oh, God. Oh, no . . .”
 
*  *  *

To learn more about Alyssa, go to

*  *  *

CONTEST

Want to win a copy?  Click here: a Rafflecopter giveaway

Thursday, May 1, 2014

Kiki Lowenstein and the Penny Pincher, Part I


Kiki Lowenstein and Penny Pincher: Part I

By Joanna Campbell Slan


Editor’s Note: The Kiki Lowenstein Mystery Series features a scrapbooking mom whose creativity isn’t limited to papercrafts. Part I of Kiki Lowenstein and the Penny Pincher first appeared in the Spring 2014 issue of Chicagoland Scrapbooker. Now we're sharing it with you!


“I saw this online and bought it for the store. I thought it appropriate,” said my friend Clancy Whitehead, as she handed me a wrapped present. In her tailored brown slacks, ivory silk blouse, and camel-colored cardigan, Clancy was the picture of elegance.

Meanwhile, I’m still wearing my maternity pants with the elastic panels. Although I tell myself that eventually the weight will come off, it’ll probably take forever. I’ve been a little down lately, feeling a touch of the post-partum blues. That’s probably one reason that Clancy bought me a gift.

My low mood is silly, because I have so much to be thankful for. My name is Kiki Lowenstein, and I own Time in a Bottle, a scrapbooking and crafts store in St. Louis. I’m the mother of three adorable kids, including three-week-old Tyler George, whom we call “Ty.” And my other half is a hunky cop, Detective Chad Detweiler.

Life is good, mainly.

Tonight starts the first of our Double-Dip Classes. Like the old Doublemint Gum commercials, we’re offering not one but two fantastic learning experiences. I’m excited about the projects I have planned for our scrapbookers. But I’m also a tad worried, because Iona Lippman has signed up for both classes, since she can be a bit rough around the edges.

“Go on,” prompted Clancy. “Open the gift.”

After my fingers carefully pried apart the pink polka dot tissue paper, I discovered an adorable sign nestled inside: “All our guests please us. Some by their coming, and some by their going.”

“Iona is definitely a ‘goer,’” said Clancy. “You can’t please her, Kiki. She’ll always find something to complain about. That’s who she is. So just relax about the classes tonight and try to have fun. Don’t let her ruin the evening.”

“Thank you,” I told my friend, “for everything.”

“You’ve got all your prep done?” she asked. “Anything I can do?”

“I’m fine,” I said. “First we’re doing the Keepsake Recipe Album. The assignment was for each scrapbooker to bring in a recipe that her family enjoys. A main dish. She should also have a photo of the food. Of course, if that’s not possible, we’ll work with just the recipe and leave a place on the scrapbook page for the photo. I assume all of them have been in to choose their albums?”

“Yes. Iona came in Friday. She doesn’t like the 8- by 8-inch size. She also didn’t like the color of the album cover.” Clancy pulled up a chair across from my big desk. Resting her face on her hands, she shrugged. “I told her you might have suggestions for customizing the cover.”

“I do.”

“What’s the second class?” asked Clancy.

“It’s called Tips from Interior Designers,” I said, withdrawing my handout from the bottom desk drawer. “Many interior designers use a 60-30-10 rule when working with colors. The dominant shade should cover 60 percent of the page, then two other colors would be 30 and 10 percent. I’m also showing the scrapbookers how they can ‘translate’ a photo of an interior design into a scrapbook page layout.”

“Fascinating idea,” said Clancy. “I’m glad I’m staying for the evening.”

“I am too,” I said.

As it happened, Clancy was a lifesaver. Two hours later, after listening to Iona complain non-stop about her album, I was happy to have someone there with a positive attitude.

“Not only do I hate everything about this album,” she said, “I don’t want a recipe book full of main courses. My specialty is dessert.”

I gritted my teeth. “Good. Since Valentine’s Day is next week, your assignment is to bring your favorite dessert and its recipe.”

“I’ll bring red velvet cake,” said Lisa Ferguson.

“No way!” shouted Iona. “I have my great-great-grandmother’s special red velvet cake recipe. It’s been passed down from the oldest daughter to oldest daughter. No one outside the family has ever seen it.”

“Whoa!” I spread my hands in what I hope was a placating gesture. “You can both bring your red velvet recipes. Since these are your personal cookbooks, duplication won’t be a problem.”

“There won’t be any duplication,” sniffed Iona, as she tugged her sleeves over her hands. Her fingers were chaffed and red from the cold. “My family recipe is simply the best. It’s never been copied. Not even close.”

“Suit yourself,” said Lisa, as she adjusted her cowl neck sweater. The weather had been unseasonably bitter. Most of my customers wore boots and gloves. Lisa was no exception. She’d arrived bundled up in a parka.

By contrast, Iona had worn a lightweight wool coat and kept her bare hands shoved deeply into her pockets.

The two women couldn’t have been more different. Iona bragged about every aspect of her life from her husband’s upcoming retirement plans to her own free time for crafting. Lisa had said nearly nothing. I knew she’d come straight from work, and she kept checking the time because her babysitter had to leave promptly at nine.

“Now that we have the matter of next week’s recipes settled,” I said, “Let’s turn our attention to Part Two of our Double-Dip. If you’d open your page kits, you’ll see I’ve already chosen your embellishments and paper for this cute scrapbook page. Clancy is passing around a copy of HGTV Magazine with a picture of the room that inspired this page.”

“That does it,” snarled Iona. “Kiki, every layout you do involves expensive embellishments.”

“She’s right,” added another customer, Avery Ailes. “I love scrapbooking but, gosh, it’s so expensive. I’ve priced these embellishments. They aren’t cheap.”

Clancy shot me a look over the heads of our customers. I could read my friend’s thoughts as easily as if she’d spoken to me: “Great…now what?”

--
 
Part II will appear in the Summer 2014 issue of Chicagoland Scrapbooker. Later this summer, we'll also post it here on this blog, so be sure to become a "follower" of the blog. To find out where to pick up your copy go to Chicagoland Scrapbooker  (www.ChicagolandScrapbooker.com)

Sunday, April 27, 2014

What You Can Do With a Ruined Tee Shirt

I have no idea how my red top wound up in the wash with all my white and cream clothes. None. Worse luck, I added a cup of bleach to the mix and let the whole mess sit for a couple of hours.

Not surprisingly, this cream top picked up a hint of red (much diluted) here and there.

Rit Dye Remover is expensive, and the top was not. However, I'd been wanting to try Zentangle on fabric, so this seemed like a perfect opportunity.

Supplies:

One piece of cardstock
A fabric pen in black

Method:

1. I didn't need to iron my top, because I'd hung it up to dry, but your fabric should be smooth.
2. Slip the card between the fabric layers so the ink doesn't soak through.
3. Choose a steady, flat surface so you don't have any wobble.


4. Start drawing.


5. Stand back and admire. Notice that I chose a very simple pattern. Less is more in my book. But this still needed something.


6. Let sit 24 hours.

7. Wear and collect compliments. (You're such a thrifty Craft-anista!)

Note: I used fabric markers that I bought online. I've been told that you can also use Sharpies. I suggest that after you let the fabric sit for 24 hours, you iron it on the WRONG side to help heat set the ink. Then wash it inside out in cold water.

Okay, anyone willing to try this? Tell me what you're going to rescue by adding a tangle!

Tuesday, April 15, 2014

Honey, You'll Never Guess What Rolled Up in the Surf

By Joanna Campbell Slan, www.JoannaSlan.com


“Florida is a giant bug light for crazy people.” ~ Phyllis Smallman, Sleuthfest 2014

It’s no surprise to any author living in Florida that some of the craziest stories we can write are actually inspired by true events in our sunshine state. Join us in exploring a different side of Florida than the travel bureau promotes with our first Blog Hop sponsored by Florida Chapter of Mystery Writers of America. Read on, click the links below to read another member’s view of crazy Florida, comment, share your favorite stories, and enter the contest to win a Kindle Paperwhite.
 
**

When people learn that I write mysteries, they ask, "Where do you get your ideas?"

You never know what will wash up in the surf.

My answer is, "They roll up in the surf."

When I first moved to Florida, I walked the beach for seashells. Some days I found a lot. Some days, not so much. But quickly the shells became secondary to the other wonderful, weird, and wacky items that have made their way to the shore.


I have found:

1. Toothbrushes -- By the handful. In fact, I'm convinced that dentists must hold conventions weekly where they toss toothbrushes over the sides of boats. How else can you explain the plethora of toothbrushes. I mean, these are a daily find!

2. A hard hat -- In bright orange. I wondered if the wearer fell overboard, or if he simply got tired of wearing a plastic helmet in the sun. (I only found one of these, but I did admire it for weeks.)

3. Syringes -- With needles. (This convinced me not to go barefoot in the sand. I'm especially careful of piles of Sargasso, the seaweed that gives the beach its distinctive odor. You never know what's inside those weeds.)

4. Vials of drugs -- This particular tube held insulin, but other beachcombers have found cocaine. Or so the police have told me.

5. Shoes -- But never a pair. And never Jimmy Choos. Or Christian Louboutins. Sigh. Still, a girl can dream.

6. Fishnets -- Not stockings, but the stuff that gets wrapped around the necks of turtles and seabirds. These I collect and take home to put in the garbage. I also pick up plastic bags. Turtles swallow these, thinking they are eating jellyfish. The bags fill their stomachs, causing the sea turtles to starve to death.

7. A boat full of marijuana -- One-point-seven million dollars worth to be exact. The smugglers set sail at eleven p.m. from Bermuda. They didn't account for how choppy the sea was, so they overturned on the beach right off my backyard. I woke up to a swarm of helicopters and DEA agents. Then came the media trucks and reporters.

I have not found a raft, but my neighbor did. Imagine the desperation that might drive someone to hop on a bunch of branches roped together and set sail for a distant shore. Nor have I found gold, but another neighbor discovered a cannon full of gold coins.

There's so much to love about Florida. And if you are a mystery writer, you don't need to go looking for ideas. They'll wash up in the surf.

**
 
Be sure to enter our giveaway for a Kindle Paperwhite. a Rafflecopter giveaway


No purchase is necessary. You must be at least 18 years old to enter. By submitting your entry, you agree to be entered into the participating authors' email newsletter list. Your information will not be shared with anyone else, and you may unsubscribe at any time. Winner will be notified by email. Authors are not responsible for transmission failures, computer glitches or lost, late, damaged or returned email. Winner agrees for their name to be used in conjunction with the contest on FMWA and authors' social media sites. U.S. Residents only due to postage constraints.
 
**

 Check out the posts by these other Florida writers--and enter to win the Kindle Paperwhite:


Victoria Allman, Gator Bites, http://www.victoriaallman.com/blog

Miriam Auerbach, Bonkers in Boca, http://www.miriamauerbach.com/bonkers-in-boca

Gregg E. Brickman, Crazy South Florida—How it got to be home, http://www.GreggEBrickman.com/blog.html

Diane Capri, Fishnado!, http://www.dianecapri.com/blog

Nancy J. Cohen, Characters Too Weird to Be True, http://nancyjcohen.wordpress.com

Joan Lipinsky Cochran, The Million Dollar Squatter: Crazy in the Land of Coconuts and Bagels, http://www.joanlipinskycochran.com/blog.htm?post=952677

jd daniels He Did What? http://www.live-from-jd.com

Joy Wallace Dickinson, “In Florida, It's Great to Be a Cracker”, http://www.FindingJoyinFlorida.com


Linda Gordon Hengerer Crazy Treasure on the Treasure Coast, http://footballfoodandfiction.blogspot.com/

Vicki Landis, Eavesdropping 101, http://www.victorialandis.com

Sandy Parks, Keep your eyes to the Florida skies, http://www.sandyparks.wordpress.com

Neil Plakcy, Moscow on the Intracoastal http://www.mahubooks.blogspot.com/

Johnny Ray Utilizing Google Plus Air to Facilitate Author Interviews, http://www.sirjohn.us


Saturday, March 22, 2014

Be a Dick: The Secret of Social Media Success

Marc Ensign spoke to our Florida Chapter of MWA today, explaining how he became a success in social media. Shortly after the Ensign family (Marc, his wife Amy, their two kids Bella and Zak, and their Bichon mix pup Gracie) moved to Florida, Marc had a life-changing encounter with a new neighbor, a man named Dick.

Dick's genuine concern and interest in the young family made the Ensigns feel instantly at home in their new surroundings. Consequently, Marc realized that if he could emulate Dick--if he could adapt Dick's generosity of spirit to his online world--that he could be just as much of an asset to his blog followers.

Here are the precepts that Marc learned from Dick: 

Be engaged
Be valuable
Be first
Be welcoming
Be humble
Be authentic
Be generous
Be transparent
Be perceptive

Be awesome 

These are great concepts. My pledge to each of you is that I'll do my best to follow Dick and Marc's examples. I'll do everything I can to reach out to each and every one of you in my social media family.(That's what you are, my extended family.)  I'll try to offer you valuable information and insights. I'll try to be the first to share interesting information with you. I promise to honor your opinions even if they differ from mine. I'll try to stay humble, and never get a big head. I'll be honest with you, and let you know the real me. As much as possible, I'll be generous, with my time, talents, and expertise. When there's a conflict or when I have a motive, I'll be upfront with you. And all the while, I'll try to be perceptive, putting myself in your place, trying to suss out what you need that I can provide. If I do all that, I have no doubt that we'll have an awesome relationship.

So tell me, how can I provide value to you?

Tuesday, March 18, 2014

Giveaway--A Miniature Easter Egg

Yes, this adorable Easter Egg is OOAK (One of a Kind), and I made it myself so it's totally imperfect! The outside is a luscious spring green, trimmed with gold lace. Inside as you can see, there's a vintage scene of Mr. and Mrs. Easter Bunny.

HOW I MADE IT
I'll tell you how I made it in another post! Can you say, "tutorial"? Suffice it to say, I tried several methods and most of them were abject failures.

HOW TO WIN IT
Starting tomorrow (3/19/2014) you can enter to win. The contest will run for one week. To enter, visit my Facebook page at http://www.facebook.com/joannacampbellslan  Under the large picture of me with a Diet Dr Pepper, you'll see a blue box labeled GIVEAWAY. Click on that box and follow the instructions.

Or you can try this link:  http://tinyurl.com/kfvuqdt

Monday, March 17, 2014

How to Make Miniature Mosiacs--Or How to Have Your Egg and Eat It, Too

There are tons of ways to make miniature tiles, usually involving Fimo or paper coated with a thick glossy agent, but I think I've stumbled on a method that's easier and more fun...as long as you're okay with tiles in random shapes. Best of all, it's a way to recycle and upcycle common items.

Behold! (Ha, ha.) A protein snack that recycles into a table with mosaic inlays or a birdbath.


SUPPLIES for the MOSAICS:
A hard-boiled egg. (an old one is best, if it float when it's raw, that's wonderful because that means the inner shell membrane has pulled away from the shell)
In the upper right, you can see some of the various eggshell pieces that I colored. Don't despair if you miss a piece or two! A white "tile" here and there will look cool. In the lower left is a finished mosaic table top. By putting big pieces of shell on the glue and then breaking the big pieces and moving them around, you save yourself a lot of aggravation trying to glue down smaller pieces.
Waxed paper.
Acrylic paints(and brush) or markers.

METHOD:
1. Roll your hard-boiled egg on a surface and gently peel away the shell. Set on the waxed paper.
2. Let the shell dry. Check that the membrane is dry.
3. Color the shell with the marker or paints. A variety of shades will work best.
4. Let dry.

Supplies for the birdbath. You can also see the weird little plastic stand that's supposed to be some sort of a kid's party favor. (Beats me!) Oh, and you can save the lid. Use the foil side as a mirror somewhere else.)
Blogger won't let me edit the caption above, but you'll use the same base as shown there for the mosaic table.

SUPPLIES FOR THE MOSAIC TABLE:
1. Small plastic base. (I used some sort of weird kid's party favor that came in a bag of six or so from the Dollar Store. I have NO idea what a kid is supposed to do with one of these! If you can't find these, you could stack beads or use a wooden turning or a spool from thread or even make something out of Fimo.)
2. Emery board.
3. Round disk. (You can use chipboard, foam, or wood.)
4. Tacky glue.
5. Acrylic paint. (White)
6. Glue spreader. (I like coffee stirrers from Starbucks.)
7. Gold nail polish.
8. Clear nail polish.
9. X-acto Knife
10. Gold trim if desired.

METHOD:

1. Chip off that weird half circle loop on the side of your plastic stand. (Save it. It makes a great handle when painted. I used cuticle clippers to cut mine off.)
2. Sand the stand smooth.
3. Paint the one flat surface of the round disk white.
4. Paint the stand, the other flat surface of your disk and the edge of the disk with gold nail polish. (You will probably need to put on two coats, especially on the plastic. Thin coats work best.) You can add gold trim to the outside edge/rim, if desired. (For example, a thin gold braid or cord.)
5. When all parts are dry, smear thin layer of tacky glue on a quarter of the white side of the disk.
6. With tweezers, pick up some of the eggshells. Push them color side up into the glue.
7. With your X-acto knife, press down. This will break apart the shells. Move the pieces far enough apart that you can add pieces of a different color.
8. Repeat with a different color until surface is covered.
9. Let dry.
10. Paint with a thin layer of clear nail polish. Be careful! If you use too much, the colors might run. You are aiming to put down a coating so this won't happen.
11. Add a thicker layer.
12. Glue the mosaic top to the plastic stand.
13. Admire.

VARIATION FOR BIRDBATH:

ADDITIONAL SUPPLY: Metal jelly or honey tub. (Mine came from a lunch at Cracker Barrel.)

1. Prepare the mosaic tiles as per above.
2. Paint the tub and the stand as per above.
3. Add eggshells as per above, but with this difference--when you get to a curve or an edge, you can put glue on the flat side and glue on the edge, then add a piece of eggshell that OVERLAPS the flat side and smoosh into the edge or curve.
4. Assemble.
5. Admire greatly.

VARIATION FOR SCRAPBOOKERS OR CARDMAKERS:

1. Prepare the mosiacs (colored eggshells) as above.
2. Glue them to chipboard letters or glue them around a mat on a photo.
3. Or glue them to a long strip of paper and use as a decorative border.

This is my FIRST miniatures tutorial. I know it's a little skimpy on the photos, but otherwise, how did I do?