Joanna Campbell Slan has moved, searching new blog...

Showing posts with label dollhouse miniatures. Show all posts

Tuesday, February 10, 2015

An A -ma-ZINNing Afternoon with Alice Zinn


By Joanna Campbell Slan

At first blush, Alice Zinn's home looks like all the other houses in her neighborhood. The building is pleasant, on a pretty corner lot in a small city in Florida. However, when she opens the door and permits you entrance, you feel like you've fallen down a rabbit hole into an enchanted universe where fairytales and wishes come to life in miniature.

Because she knew I was interested in her workspace, Alice took me on a quick tour of her shop before we had the lunch she so kindly prepared. The converted garage is packed with supplies, as you might imagine, but most importantly, everything is labeled. Alice can put her hands on things quickly. I stood there and turned a tight circle at the stacks of plastic storage tubs that lined the walls and towered over my head. Her computer is at a right angle to the desk where she works, and therefore, perfectly situated for convenience. Although she enjoys working from the comfort of a big cushy office chair, because her work space is so large, she also makes use of a backless stool on rollers so she can scoot along the corridor in her warehouse of supplies.

When you meet Alice, you are immediately struck by her active, seeking mind. Her breadth of knowledge about the world in general is amazing. Her process is one of problem-solving. The pneumatic stool is an example. Its height is easily adjustable, and there's a tray on the bottom so the stool can actually be used to transport items. Really, it's perfect. I found myself coveting this handy seat. Alice laughed and said, "Stop by Harbor Freight. It's on your way home." I did and bought one for myself, a bargain at $26.

Walking from the workroom into the house, I paused to gawk at the shelving over the top of the doorsills. Alice set cove molding a ninety-five degree angle, turning the wood slats into narrow shelves. On these she's displayed miniature chairs in all sorts of furniture styles. There's also a cabinet full of gifts, including a china collie given to Alice by her grandmother. Alice was eight at the time and suffering from chickenpox. Young Alice was bothered by the fact that the dog didn't have fur, which made the piece more like a statue than a miniature pet. Many years later, when Alice decided to make miniature animals for a living, she set herself the task of making them furry, because no one else was doing so at the time.

We passed Alice's bathroom, and oh, my! A person could get lost in there. She's packed the place with tiny scenes, including a shadowbox of Teddy Bears, which houses another childhood favorite of hers. There's also a small nautical scene on the back of the toilet. "Guests go to the restroom and take forever," said Alice. "They get so involved with the minis."

As I wandered around Alice's home, it was delightful to pause and admire all the minis, including one particular castle, a showcase for Alice's sense of humor. The piece is called "Fear of Flying." It depicts a wizard teaching a young dragon to spread his wings.

"Dis-embarking"  *  Photo courtesy of Alice Zinn.
Nearby is a large Japanese house with a most unusual provenance. It was built post-WWII by a Japanese architect who wanted Westerners to see what a typical Japanese home was like. Alice's iconic Noah's Ark scene—"Dis-embARKing"—took my breath away, as I challenged myself to find as many of the 54 pairs of animals as I could. This is harder than it sounds, since tiny creatures scamper their way up the trees and hide in the leaves. The faces on her tigers are truly exquisite.

Her Amish barn scene shows off Alice's commitment to being tech-savvy. To produce two tiny saws and a wagon wheel, she turned to a "plotter," a "Wishblade" by Xyron. This machine allows Alice the freedom to design whatever she wants and let the machine cut it out for her.

A scene with Calpurnia and Caesar, emperor of Rome, delights the viewer, as it is easy to imagine these tiny people come to life. Their costuming is exquisite, right down to the way that Calpurnia's gown is carried over her forearm. The hair on Calpurnia is stunning, her tiny curls arranged perfectly in a noble style.

It is hard to believe that Alice designs the settings, curates and creates the furnishings, and creates the dolls as well. This speaks to the multiplicity of her talents.

Joanna Campbell Slan holding the "piano man" and the "bartender" by Alice Zinn.
In another room, Alice has the "Piano Man" scene she's busy creating for the Tom Bishop Show that will be held in Chicago, April 17-19, 2015. The dolls have already been created, although they have not yet been dressed. Currently, Alice is toying with the placement of the various elements that will bring the Tropical-style bar to life. We discussed where she might place a tiny gift shop, a cute way to display more tropical minis as part of this setting.

When assembling a "museum" scene that depicts various cultures, Alice likes to include a miniature house. These "minis within minis" serve as Alice's nod to the industry and a wink to her audience. They serve as a vivid reminder of the pervasiveness of miniatures through all cultures in all eras.

I left Alice's workshop with my head spinning. In fact, I went into a sort of "craft-induced" mental fugue state. Creativity begets creativity. Watching Alice decide what to place where in her "Piano Man" setting, see all the fantastic scenes she's already made, soaking up tidbits about her process, and thinking of how to apply all this to my own life nearly overwhelmed me. It occurred to me as I climbed into my car that I'd just attended a Master Class in miniatures from a Master of the Craft.

< > < > < >

 
Coming soon--"Ten Things I Learned from Miniaturist Alice Zinn That Any Miniature Enthusiast Can Use"
< > < > < >

Joanna Campbell Slan is the author of twenty-eight books, including three mystery series. She loves turning trash into treasure. She shares tutorials on her blog http://www.joannaslan.blogspot.com You can follow her on Pinterest at http://www.pinterest.com/joannaslan

For a free sample of Joanna's work, send an email to her assistant, Sally Lippert at SALFL27@att.net and request the free copy of Ink, Red, Dead, one of Joanna's mysteries.

Visit Alice Zinn at her website http://www.AliceZinn.com or see her in person at the Tom Bishop Show. For info on the show, go to http://www.bishopshow.com/chiinfo.htm

Tuesday, October 7, 2014

Giving in to my Inner Scrounger

My Beta Babes and I went out to eat at Pasta House in St. Louis.

I tried to behave, really I did. We had a great lunch and fun talking with each other.

But I started lusting after the plastic butter tubs. And the margarine containers. I kept imagining ways I could use them.

Then I said to myself, "What will they think of me if I start collecting trash?"

I decided, "I don't care. That's who I am. That's what I do. Either they like me for myself or not."

So I asked the person next to me for her empty margarine containers. She kindly handed them over. Soon everyone was handing me empty plastic containers. I filled my purse with them. One of the husbands tried to give me the rest of the full tubs in front of his place. (Bless his heart. He was so sweet. I had to explain that the butter wasn't the point.)

I carefully cleaned them in my hotel room, packed them in a box, and had them mailed to me with a bunch of other supplies.

Last night I began putting together a kitchen cabinet from a kit. As usual, I modified the kit a lot. The way they were constructing the sink was silly. It wouldn't look good!

Then I remembered my margarine containers.

One of them worked perfectly.


I am so glad I gave in to my inner creative scrounger. Yes, I was a bit embarrassed by my greed for garbage. But if I hadn't have asked, I wouldn't have had the butter tubs for my project. I also wouldn't have saved those tubs from the recycling bin.

And I wouldn't have been true to myself. I would have pretended to be someone I'm not. I'm not too proud to ask for what I need.

How about you? What crafting supply do you find impossible to resist? When have you embarrassed yourself for the sake of a craft?

Wednesday, July 2, 2014

How to Make a Hummingbird Feeder -- Miniature Tutorial (1:12 scale)

I love using things that would normally hit the trash can. This project reminds me to look at familiar objects with fresh insight. For years I've tossed away the lids to the McDonald's beverages. I was amazed when I looked carefully and noticed the raised icons. I can't wait to see what I can do next with the other emblems!


SUPPLIES:

Red nail polish or acrylic paint
Yellow nail polish or acrylic paint
Red paper
Length of green floral wire (six inches)
Scissors
A needle or something to poke a small hole with
Circle punch (preferably the same diameter as the straw
Tacky Quick Drying glue
Clear drinking straw
The plastic lid from McDonald's cold beverage
Either--cardstock or air-dry clay


METHOD:

1. Locate the icon on the beverage that looks like a flower. Press air-dry class (such as DAS) into the icon and let dry. (Alternative: Cut out the flower. Glue it to cardstock. Cut out around it again.)
In the eleven o'clock position on the lid, you can see the flower icon.
 

2. When the icon is dry, paint it bright red. Add yellow dots to the flowers. (Tip: Use the end of a toothpick to make the dots perfect.)

3. Cut a length of the straw, about 1 inch long or so.

4. Cut a thin strip of red paper, about 3/8" wide and an inch long. Glue it around the top of your length of plastic straw. Let dry.

5. Put out a circle from the red paper with your circle punch. (Alternative: Trace the end of a straw on red paper. Cut out the traced circle.)

6. Put a tiny hole in the middle of the red circle. Enlarge it until the green floral wire will fit inside. Bend the floral wire into an upside down letter "L". Poke the shortest end into the hole in the red circle. Glue it to the red circle. You now have the cap of the lid and the wire stand.

7. Attach the red circle (cap of the lid and wire stand) to the top of the straw so that it meets the red strip of paper. Glue together. Coat with red nail polish.

8. Glue the flower to the bottom.

Sunday, June 29, 2014

How to Make a Miniature Rustic Bench

My sister has this wonderful rustic chair outside her house. It was made with twigs (okay...BIG twigs), and I love it. Right now, rustic/twig furniture is all the small rage. This pattern will work for a real miniature setting (1:12 scale) or for a fairy garden.


This was also inspired by the wonderful tutorial by Lesley Shepherd. I urge you to check it out before you start this project. http://miniatures.about.com/od/miniatureprojects/ss/arustictble.htm

SUPPLIES:

Bendable twigs (I got mine from an Australian pine tree) in a variety of sizes (six, eight, and ten inches?)
Twigs of all sizes
Pine needles, dried (ditto that Australian pine) (or craft grasses or floral wire)
Cardstock (old cereal boxes are great)
Clothespins or clips
Wood glue or Elmers glue
Tacky glue (quick drying)
Waxed paper
Pencil
Black marker (a Sharpie)
Craft knife
Glass jar (2" across the lid. I used a 3 oz. jar of capers. Probably a glass Coke bottle would work, too.)
A pot to boil water in (I keep an old pot for crafting. Don't use it to eat out of later!)
Balsa wood, cut to 3" by 1 1/2" by 3/8" (This will be the seat of your bench)
Floral wires (Three or four. The plain uncolored type is best.T
Brown and black paint or markers
Hedge clippers or sturdy scissors
Tongs


METHOD:

1. Choose four small twigs to be legs for your bench. These should be roughly the same size. Set these aside. Tip: If they aren't the same length, use the hedge clippers or scissors on them. You can also sand them down to the right length. Mine are about 1 3/4" long.

2. Bend your longer twigs so that one end touches the left and one touches the right of your piece of balsa wood. The twigs should NOT break but it might not want to bend to this shape easily. That's okay. We're going to help it along.

3. "Drill' holes on the left and right to hold the ends of the twig. I used the tip of my X-acto knife and turn it around and around to "drill" the holes.


2. Fill your pot with water and start it boiling. Take it off the stove and put your twigs in the water. After about a five minute soak, use your tongs to retrieve them. Bend them around the jar. Clip the two ends of each twig together with clothespins and let them sit for an hour or so.

3. Use your piece of balsa as a pattern and trace it onto the cereal box. Cut out the rectangle. Draw an X in the middle of the rectangle, to delineate four triangles. Number the triangles 1, 2, 3, and 4. Cut them out. Using the balsa as a pattern, mark the holes with your Sharpie. Punch out holes in the cardstock to match where you have the holes in the balsa.


Learn From My Mistake or LFMM (because I make a lot of mistakes!): You'll notice that I marked the triangles on the plain, unprinted side of the cereal box--and then I covered those markings with pine needles. DUH! Mark the printed side of the box, not the plain side. (In other words, do the opposite of what I'm showing you above.) You'll use the plain, brown, unprinted side to glue your pine needles on!)

LFMM Draw an arrow showing you which way to point your pine needles. They should all point in, towards the center of your seat. This arrow will go on the plain side of the box, as I've shown you below. If you don't do this, you can get confused. Your pattern won't come out right.


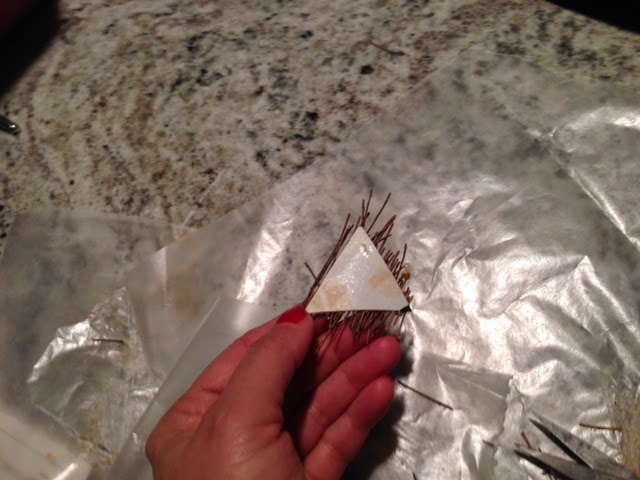
4. Using the wood glue, start gluing pine needles onto the triangles. Keep the needles straight and next to each other as you go. They will hang over the edge of your pattern. No biggie!

LFMM (Remember that acronym! I'll use it a lot!) Don't spread the glue all over the triangle. Instead, make a stripe of glue about a quarter of an inch wide. Work one stripe at a time. This will give you more control.

LFMM Cut the pine needles into shorter pieces, about two inches long. They naturally have a curve. By cutting them, you don't have to deal with the curve.

LFMM To corral these little suckers, and to get them to line up neatly, use the tip of your X-acto knife or a plastic credit card.

5. Wrap the triangles in a piece of waxed paper. make a sandwich of them. Put something flat on them to help them dry properly. Alternatively, you could use two pieces of heavy plastic (like from a take out container) and pinch it together with clothes pins to help the triangles to dry flat. You might also want to add a little more glue to the top of the triangles. But not too much or the glue will show a lot.


6. Neatly trim the excess pine needles. Use your scissors.


7. If the bent wood is dry enough, you can unclip it. (You'll be amazed at the wonderful bend you'll get!) Size one piece to be the primary bent back for your bench. Test it and put it in the holes. Trim it with the hedge clippers or scissors if necessary. Insert into the holes, add glue, and use a bit of masking tape to hold them in place until they dry.


8. Using paint or markers, color your floral wire brown-black. Let it dry.

9. Reassemble the four triangles that make up the seat for your bench. (You're going to be so happy about those numbers on the back. They'll really help!) Adjust holes for the bent twig back of the bench. If you are happy with how it looks, glue the triangles onto the bench seat, the balsa wood. Trim around the seat with longer pieces of pine needles. See the photo below? I used a bit of masking tape to keep the longer pine needles down as they dried on the trim.

LFMM Lesley Shepherd used longer "pine needles" (she bought craft grasses) and first set down an X in the middle of her seat. Then she added the triangles. This made the whole thing look more finished.


10. Add another bent twig back. This one will be larger than the first. Glue the ends of it next to the ends of the first bent twig back.

LFMM You might want to make a tiny notch in the bench seat for the new twig back. It'll help keep the twig stable.

11. Wrap wire between the two bent twig backs.

12. Add spindles made of more twigs to the back.

13. At this point, you're basically done. You can add "arms" by trimming another bent twig and gluing to to one of the backs and to the seat. You can also add spindles between the legs, wrapping them with wire, if so desired.


Don't forget to admire your work. What a clever, clever crafter you are!

If you have any questions, just put them in the comments section below or email me at JCSlan@JoannaSlan.com

Friday, June 13, 2014

Miniature Basket Tutorial

This is a fun project that keeps another bit of plastic out of the landfill. Here are two finished versions of this project.


SUPPLIES:


Empty and clean plastic coffee creamer container
Quilling strip (or strip of paper cut 3/8 inch wide)
Duct tape (optional)
Masking tape (cut into half inch pieces)
Scissors
Punch (optional)
Paper to match or contrast with your quilling strip
Beads (optional)

METHOD:

1. Cut the rim off the creamer container.


2. Carefully cut the container into spokes. (Tip: Follow the indentations.) (Note: You could use a permanent marker and color the base of your basket--the creamer container--at this point.)

3. Tape down the quilling strip.


4. Begin to weave it over and under. (Tip: If you have an even number of spokes, skip two at the start of each round. That gives you a nice alternating woven pattern.)


5. Use bits of masking tape to hold down each new quilling strip row. Otherwise the qulling strip will side up, up and away!

6. When you are as high as you want to go, tape down the end of the quilling strip.
7. Stick a piece of duct tape to a cutting mat or a glass surface. Cut it into a thinner strip. (Tip: Use a craft knife and a cork-backed ruler for this.)


8. Peel off the duct tape and wrap it around your basket. Alternatively, glue a quilling strip around the top of the  basket.


9. Decorate your basket with punched shapes and beads.

Ta-dah! Aren't you smart? (I know YOU are!)

Monday, March 17, 2014

How to Make Miniature Mosiacs--Or How to Have Your Egg and Eat It, Too

There are tons of ways to make miniature tiles, usually involving Fimo or paper coated with a thick glossy agent, but I think I've stumbled on a method that's easier and more fun...as long as you're okay with tiles in random shapes. Best of all, it's a way to recycle and upcycle common items.

Behold! (Ha, ha.) A protein snack that recycles into a table with mosaic inlays or a birdbath.


SUPPLIES for the MOSAICS:
A hard-boiled egg. (an old one is best, if it float when it's raw, that's wonderful because that means the inner shell membrane has pulled away from the shell)
In the upper right, you can see some of the various eggshell pieces that I colored. Don't despair if you miss a piece or two! A white "tile" here and there will look cool. In the lower left is a finished mosaic table top. By putting big pieces of shell on the glue and then breaking the big pieces and moving them around, you save yourself a lot of aggravation trying to glue down smaller pieces.
Waxed paper.
Acrylic paints(and brush) or markers.

METHOD:
1. Roll your hard-boiled egg on a surface and gently peel away the shell. Set on the waxed paper.
2. Let the shell dry. Check that the membrane is dry.
3. Color the shell with the marker or paints. A variety of shades will work best.
4. Let dry.

Supplies for the birdbath. You can also see the weird little plastic stand that's supposed to be some sort of a kid's party favor. (Beats me!) Oh, and you can save the lid. Use the foil side as a mirror somewhere else.)
Blogger won't let me edit the caption above, but you'll use the same base as shown there for the mosaic table.

SUPPLIES FOR THE MOSAIC TABLE:
1. Small plastic base. (I used some sort of weird kid's party favor that came in a bag of six or so from the Dollar Store. I have NO idea what a kid is supposed to do with one of these! If you can't find these, you could stack beads or use a wooden turning or a spool from thread or even make something out of Fimo.)
2. Emery board.
3. Round disk. (You can use chipboard, foam, or wood.)
4. Tacky glue.
5. Acrylic paint. (White)
6. Glue spreader. (I like coffee stirrers from Starbucks.)
7. Gold nail polish.
8. Clear nail polish.
9. X-acto Knife
10. Gold trim if desired.

METHOD:

1. Chip off that weird half circle loop on the side of your plastic stand. (Save it. It makes a great handle when painted. I used cuticle clippers to cut mine off.)
2. Sand the stand smooth.
3. Paint the one flat surface of the round disk white.
4. Paint the stand, the other flat surface of your disk and the edge of the disk with gold nail polish. (You will probably need to put on two coats, especially on the plastic. Thin coats work best.) You can add gold trim to the outside edge/rim, if desired. (For example, a thin gold braid or cord.)
5. When all parts are dry, smear thin layer of tacky glue on a quarter of the white side of the disk.
6. With tweezers, pick up some of the eggshells. Push them color side up into the glue.
7. With your X-acto knife, press down. This will break apart the shells. Move the pieces far enough apart that you can add pieces of a different color.
8. Repeat with a different color until surface is covered.
9. Let dry.
10. Paint with a thin layer of clear nail polish. Be careful! If you use too much, the colors might run. You are aiming to put down a coating so this won't happen.
11. Add a thicker layer.
12. Glue the mosaic top to the plastic stand.
13. Admire.

VARIATION FOR BIRDBATH:

ADDITIONAL SUPPLY: Metal jelly or honey tub. (Mine came from a lunch at Cracker Barrel.)

1. Prepare the mosaic tiles as per above.
2. Paint the tub and the stand as per above.
3. Add eggshells as per above, but with this difference--when you get to a curve or an edge, you can put glue on the flat side and glue on the edge, then add a piece of eggshell that OVERLAPS the flat side and smoosh into the edge or curve.
4. Assemble.
5. Admire greatly.

VARIATION FOR SCRAPBOOKERS OR CARDMAKERS:

1. Prepare the mosiacs (colored eggshells) as above.
2. Glue them to chipboard letters or glue them around a mat on a photo.
3. Or glue them to a long strip of paper and use as a decorative border.

This is my FIRST miniatures tutorial. I know it's a little skimpy on the photos, but otherwise, how did I do?